Showing posts with label baking. Show all posts

Adventures in Cookiebaking  

Posted by: anna* in , , , ,

Today the weather is awful. It´s raining, but not like real rain, more like an annoying drizzle that you can not escape. The perfect time to update, right? 
So, what has happened since the last post? Mmmh... not much, really. I did a whole lot of nothing because I deserved it. I read books, plotted with friends to write books and ignored my still uncertain future. I went to Amsterdam for a single day of sightseeing (and grocery shopping: Rundvlees Kroketten and Kokosbrood) with Jens. That was fun! I met friends (that night out with Ann & Conny...priceless fun, girls!), applications for two masters programmes are running, waiting for replies, and of course I cooked.  And I´m still waiting for the pears in my backyard to get ready for pie.
Apart from that... Sorry I´m boring. 
But today I bring you my cookie recipe that I got a long long time ago from a (then) friend. Thank you, Romney! 
And also I bring you the fun I had with it today. I kinda felt like baking today and decided to do this recipe. I haven´t made those cookies in at least 5 years if not longer but I remember them being yummy and chewy and overall perfectly American Cookie cookies.  I strikes me as still a bit early for german cookies (kekse) since those are pretty christmas-sy and also a lot of work. Even though the supermarkets tell me it´s never too early for christmas with them selling christstollen and stuff already. 
Anyhow. So I made cookies.

Ingredients

1 Cup Sugar
1/2 brown Sugar
2 Eggs
1 tsp Baking Soda
a pinch of Salt
1 Cup Butter
Vanilla Sugar
3 Cups Flour
2 Tbs warm Water
Chocolate Chips

How to: 

Mix the sugar and the eggs together. I actually don´t really like brown sugar so if I don´t happen to have any at home, well... then not. White sugar will do. 
Add the baking soda and the salt, then vanilla sugar (i use one of those little baggies it comes in here...) and the butter. 
Butter should almost always be room temperature when you´re baking. At least make sure it´s not ice cold and super hard. Yes, it will melt in the oven eventually but you might feel less frustrated if you have an evenly mixed dough to begin with. 
Then stir in the flour and two tablespoons of water. The dough will now act like an ass and rather cuddle with the mixer than become a good dough... 
Once you have an evenly mixed dough, add chocolate chips. 
I used Twinkelz Hagelslag that my mom got us from the Netherlands. Just because I like it. Also I couldn´t decide whether I wanted white or dark chocolate. Here we have both. Yay.
Here´s your cookie dough then. You decide now whether you eat it right now, as it is, or if you  proceed to actually make cookies, baked and all. 
I decided to be strong and make cookies. Take a little spoon and drop little dough mountains on the bakingsheet. Make them as big as you like, just keep in mind, that they will spread out. So don´t put them too close together. Unless you really want one giant cookie of course. 
Now comes the adventure part. My instructions say: Bake for 10 mins at 190°C. 
Ok. Sounds easy enough. But not with my psycho bitch oven.
First batch: still half raw after 10 minutes. Tastes good, does not make a great gift. 
Second batch: I decided to let them in a bit longer. say... 3 Minutes longer. Burned. Doesn´t look that bad? Ha, not on the reverse side! I wonder if duckies in ponds are allowed to eat burned cookies...?
Third batch: I decide to let them in for ten minutes then check on them every ten seconds to prevent them burning. After ten minutes they´re perfect. 
WTF, oven? 
4th&5th batch: No surprises
6th batch: I forget to turn on the kitchen timer and wonder how long ten minutes can be. Saving the cookies just before they turn black. 
So, whatever. If you have a nice, non-psychotic oven unlike mine and unlike me are able to properly use a timer, 10 minutes per batch should do the trick. 
I wonder if there will still be some left tomorrow to take to work for buying my colleagues love and bribing my boss into giving me more hours... 

This is easy, tasty and, in a normal kitchen, fun to make. Try it! And live to tell. 

Thanks for reading. 
Love,
a*

Rhubarb, Baby!  

Posted by: anna* in , , , , , ,

It´s Rhubarb season! It doesn´t look much like spring and the weather has been crazy from bitter cold to moist and warm but I want it to be spring now. So I felt like I should make something rhubarb-y. But I have never made anything from or with rhubarb ever before. I did, however, always like a good rhubarb cake, something that suddenly strikes me as incredibly german. 
Because I felt it would be fun and to keep them busy (because two kids each isn´t enough?) I challenged two friends to make something with rhubarb as well. How are you girls doing? :D 

Here´s what I made: 

Coconut-Rhubarb-Cake

Ingredients
100g Rhubarb
75g Flour
50g shredded Coconut
2 Eggs
100g Sugar
40g Butter (room temperature)

Vanilla Essence if you like
Butter for the pan

This was enough for me to make a small cake, if you want a bigger one, please ajust the measurements accordingly. The original recipe I altered here used 4 times as much as I did so I guess that should make one big cake.

How to
First: Preheat the oven to 180°C.
Rhubarb!
Like I said this was my first time working with rhubarb. Google told me not to peel it when it was young and "tender", like it would be early in the season but to absolutely peel it when it was "stronger" later on. Well, you funny internet-people, I have no clue how to tell those two conditions apart if I have never seen either so I peeled the thingies anyway. Can`t hurt, right? 
The peeling proved to be fairly easy but stringy, just like peeling asparagus.
So: peel and cut Rhubarb.
Peeled and cut.
Put flour and shredded coconut in a bowl, mix well, add the cut rhubarb. 
I for my part like my coconut powdery and not stuck between my teeth so I shredded it even finer in the blender beforehand. Not as fine as flour but... well, finer than what the store sells. I just think that this makes coconut things easier to eat. 
Next seperate the eggs and beat the eggwhites. When it starts to get stiff, add half the sugar. 
Now mix the eggyolks with the butter and the other half of the sugar. It should be all foamy and looking very yummy (but really it´s just very buttery... and I really don´t like butter.>_<).
If you would like to, add a touch of vanilla essence here.
 Butter, sugar, eggyolks...
...all foamy.
Carefully fold in the eggwhite-sugar into the butter-sugar stuff. Sounds easier than it is because butter will be butter and hence not very cooperative. Be careful not to lose all the eggwhite fluffiness. 
Almost batter.
Now fold in the rhubarb-flour mix. Again. Carefully, please. Because there is no baking powder or soda in this recipe the fluffiness from the eggwhites is all the fluffiness this cake will have.  (Fluffiness is a funny word. I like it, did you notice? Fluffy, fluffy, fluffiness!)
I tend to get impatient and angry at batters not combining as I would like them to and then just beat the crap out of everything... Not very wise. I did an okay job this time, though.
Batter that made the cake.
That was pretty much it already. Now put the batter in a well buttered cake pan and put in the oven. 
Almost cake now.
For quite some time! Since the original four-times-as-much-recipe said to leave it in for almost two hours I figured I´d start with 50 minutes. After this time I checked the cake, found it still partially liquid inside so then I covered the cake with aluminium foil and gave it another 20 minutes. 
I left it in for 1 hour 10 minutes
Maybe a bit much, the sides were a bit burnt. Maybe try 10 mins less? 
 The cake! 
I liked this cake. A lot. The coconut came out nicely but without taking away any attention from our leading man, the rhubarb. I wish I had used a bit more of that, though. 
It did turn out moist and fluffy and makes a great spring cake. Not too light and summery but not a heavy winter food, either. I´m betting it`s super yummy with some whipped cream...
Cake!
I liked it. Go try it yourself. Or: try something else with rhubarb. I´d be glad to hear about everyone elses experiments. ^^
Thanks for reading. 
Love,
a*

PS: Fun fact: Rhubarb is officially a vegetable in Germany while in the US it has been classifed as a fruit in 1947.

Soufflé!  

Posted by: anna* in , , , ,

Last thursday was a national holiday so I had time. Guess what I did? Rrright! I made a soufflé. 
 
Didn´t I write about the nice spring-y weather last week? Well it´s gotten all gray and rainy. Again.
I could also need a kick in the butt to finally start doing serious work for my bachelor thesis... Any suggestions anyone? 
Somehow I managed to not do much this week. I did, however, develop some good plans and strategies to keep my mind off that thesis. Suddenly I´m planning to write a novel, found a gazillion books to read, thought of craft projects, checked half my cook books for the next thing to cook... Procrastinating deluxe! 
This has a good side though: I challenged two friends to make something with or from Rhubarb. Looking forward to that! 

I seriously haven`t had as much time in the past 15 year as I have now. The chance to try some stuff I always wanted to make, right? For a couple of years now I wanted to make Soufflé. But somehow... I was scared. It sounds so difficult. I tried anyways.
Since Soufflé struck me as something delicate and not to be messed with I used a recipe and completely stuck with it! None (!) of my books had a recipe it in so I used one by one of Germany`s/Austria´s best known TV-chefs, Johan Lafer. I´m not a particularly big fan of his but I wanted to make sure that this Soufflé was going to be at least edible.
So here it is: 

Soufflé

Ingredients:
50g Butter
50g Flour
200ml Milk
4 Eggs
Vanilla (I used extract)
Sugar and Butter for the dishes

Nice short list, right? 
First things first: Preheat the oven to 200°C 
Butter the soufflé dishes, the pour sugar in and make sure it sticks to the butter. All over the place, baby! 
 Sugared dishes
Melt the butter in a pot. Make sure it doesn´t brown. 
Molten butter
Add the flour the butter, stir well and make sure you don´t get floury clumps. What you have now is a roux. A very buttery roux but in theory you could go on and make some delicious sauces with this. 
Let it simmer a bit, keep stirring and don´t let it darken. 
 Butter & Flour = Roux
In the meanwhile bring the milk and vanilla to a boil. 

 Vanillamilk... Mmmmh.... Reminds me of elementary school....
Add the vanillamilk to the roux. Mix well, mix fast, you don´t want clumps and bumps.
I thought after that I´d have a batter. But it just looks... funny. 


A blob. Butter, milk and flour. Vanillaflavor.
Transfer the blob to a bowl and add the four eggyolks. 
I was very much afraid that a) the eggyolks would inspissate and I´d have egg chunks or b) the yolks wouldn´t mix properly at all and I´d have a blob, painted eggy- yellow. 
Yes, I was highly suspicious of that blob.  I thought this was going to be one big fail.
But the yolks made a handsome batter out of the blob. A bit sticky but looking good.
Finally: batter!
In a seperate bowl (doh!) beat the eggwhites until you can play with them by holding the bowl over your head without being showered in eggwhites: Beat them stiff! This should be easier, legend has it, if you add a pinch of salt at the beginning. When the egg starts to stiffen, slowly add the sugar. 
Resist the urge to make meringue instead. 
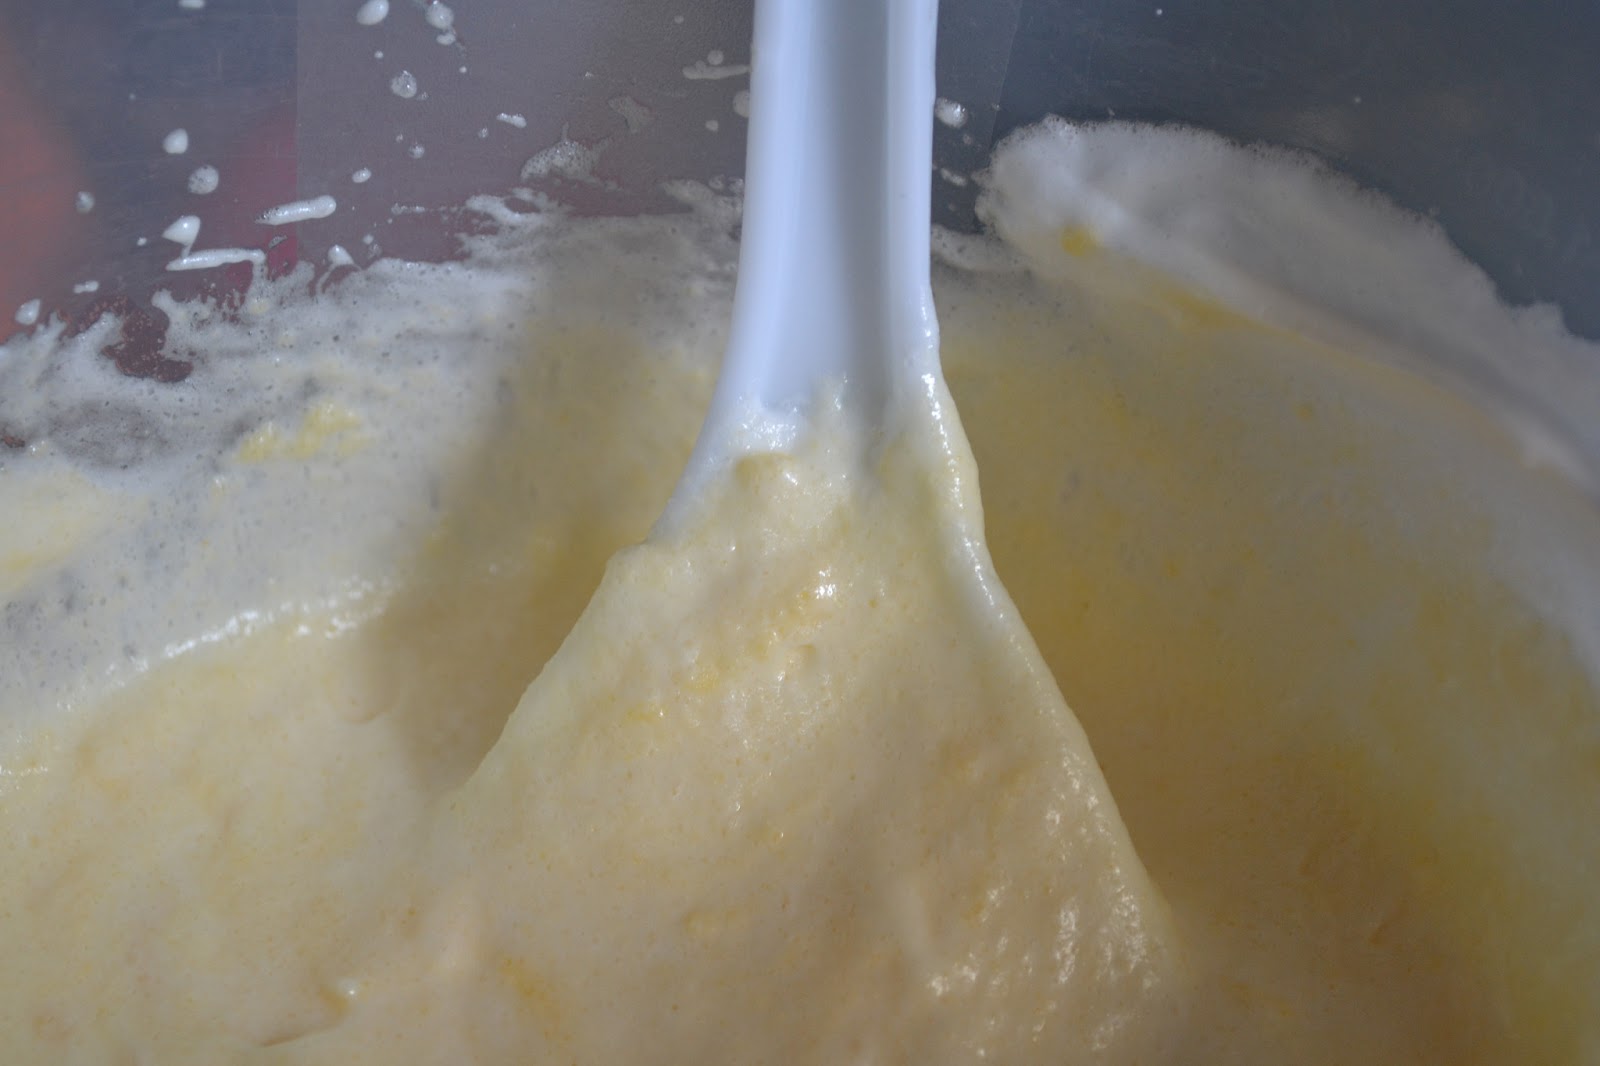
Carefully fold in the eggwhites. This was not as easy as it seems because the yellow batter formerly known as the blob proved to be quite... resistant. It did work out in the end, though.
Fluffy Soufflébatter...
Now fill the (already pretty yummy) batter into the sugared soufflé dishes.
I used six dishes but since mine are rather small I had to fill them pretty good...
Now put them in the oven and let them bake for 12-15 minutes. 
Do not, I repeat, do not open the oven to sneak a peek in. There is no baking powder or something similar in your soufflés and you still want them to rise, right? They´re shy, give them a bit of privacy. 
Now, I set my kitchen timer to 14 minutes. My oven isn´t the fastest. After what felt like an hour to me i got suspicious because I hadn´t heard the alarm go off yet. Obviously either my kitchen timer is broken or I was too stupid to turn it on. Anyways, I had to open the oven and take a look and my soufflé turned out to be done but a little bit too brown. 
If you try this, make sure you set the alarm correctly. Make sure they are goldenbrown, not slightly-charred-wood-brown like mine...
Still came out ok: 
Outside...
...and in.
Very tasty. Very fluffy on the inside with a nice crust and the sugar in the dishes melts to a great caramel... They do collapse pretty fast so eat them immediately.
I for my part can´t wait to try it again, this time maybe chocolate? Or something savory? Ooooh, cheese-soufflé.... 
Overall: Yes, it´s a bit tricky, but not as bad as people say it is. You do not need to tip toe around your kitchen or whisper around a soufflé, it just wants to get ready all by itself. Understandable, right?
Go ahead, try it. It´s very good and it sounds so impressive! :D
Thanks for reading.
Love, 
a*

Back Home, Back to Cooking  

Posted by: anna* in , , , , , ,

Hello again. It´s been a while. Again.
I´ve been away, actually. In Japan. Which is pretty much Shangrila foodwise. At least it was for me. So much good food. I really, really enjoyed my stay. Perfect University (Tokyo Gakugei Daigaku), perfect friends, new and old (thanks and I miss you, you know who you are), perfect life as an exchange student. So carefree.  Everything good except for the kitchen of my floor in the dorm I stayed in. That was ... gross. So gross that I didn`t even want to cook my spaghetti there. So: hardly any cooking for me. Not cool considerung that I had access to a gazillion new things I could have tried out. Funny veggies and funny fruits, strange noodles, fishies I have never seen before or after, great meats (the beef, oh, the beef!)... But, well, can´t help it, right? 
I came back home, reluctantly and very unhappy, in march and of course I cooked. Actually my kitchen was one of very few things I was looking forward to. 
Of course there are other things for me here, now that I´m back. I had to get my job back (successfully achieved, that), I´m gathering books and reading things for my bachelor thesis that I´ll have to start writing soon, I have to start thinking seriously about what I want to do afterwards... Unsurprisingly my thesis will be about food. I will have to read books about japanese food and watch TV shows about it. Inspiration galore!
In the meantime I hope I´ll be able to cook. New stuff. Good stuff.
Here´s some of the stuff I made lately (mostly fails so no recipes):
For Easter I tried some good old yeast... stuff. Traditional german Hefezopf, sweet braided bread. 
It was a drag. First the dough wouldn´t rise. I decided to just ignore that and still get on with what I was doing. I braided it, let it raise (unseccessfully) again, then bake it. And boy did it grow in the oven... Suddely I had this giant... whatever! I was not happy.  Apart from being not the most attractive thing I´ve ever baked it also was kind of dry. Not really bad when it came to the taste but also not very good either. I´ll try again.
Then I made Purin. Japanese style steamed Custard Pudding. I got the recipe from my old japanese teacher (I miss you, Satô Sensei!) and it always worked great. But. While in Japan I kind of got addicted to something called "Morinaga Yaki Purin", baked Purin from the store. It was great so I wanted to try making baked Purin as well.
It tasted great. But looked... Well, you see, Purin has to be as smooth as possible. No bubbles inside allowed. My Purin was all bubbles. I will get this to work (I bought these little purin forms in Japan so I´ll just have to) and once I got it right you´ll get the (really easy) recipe here and tell you all about how to get bubble free Purin.
Last thing: Omlette. There´s bacon and peas in there but no secret. Just eggs, scrambled, salt and pepper. It just looks good, I think.:D
Oh yeah, I bought a camera. First day in Japan, I got to have a new DSLR. So I´ll try to take pretty pictures of food from now on. For those interested: it´s a Nikon D3100.Not very fancy but it does what I want it to. Yay.
Once again I´ll promise to write here more often. I´m aiming at once a week because if that worked out in Japan, it should work out here.
So: See you next week. ^^
Thanks for reading.
a*

Easy Apple Pie  

Posted by: anna* in , , ,

It´s weekend, fun time. And I´m sick. Instead of having fun, I´ll stay in. So I might as well tell the world about some cake I made. 
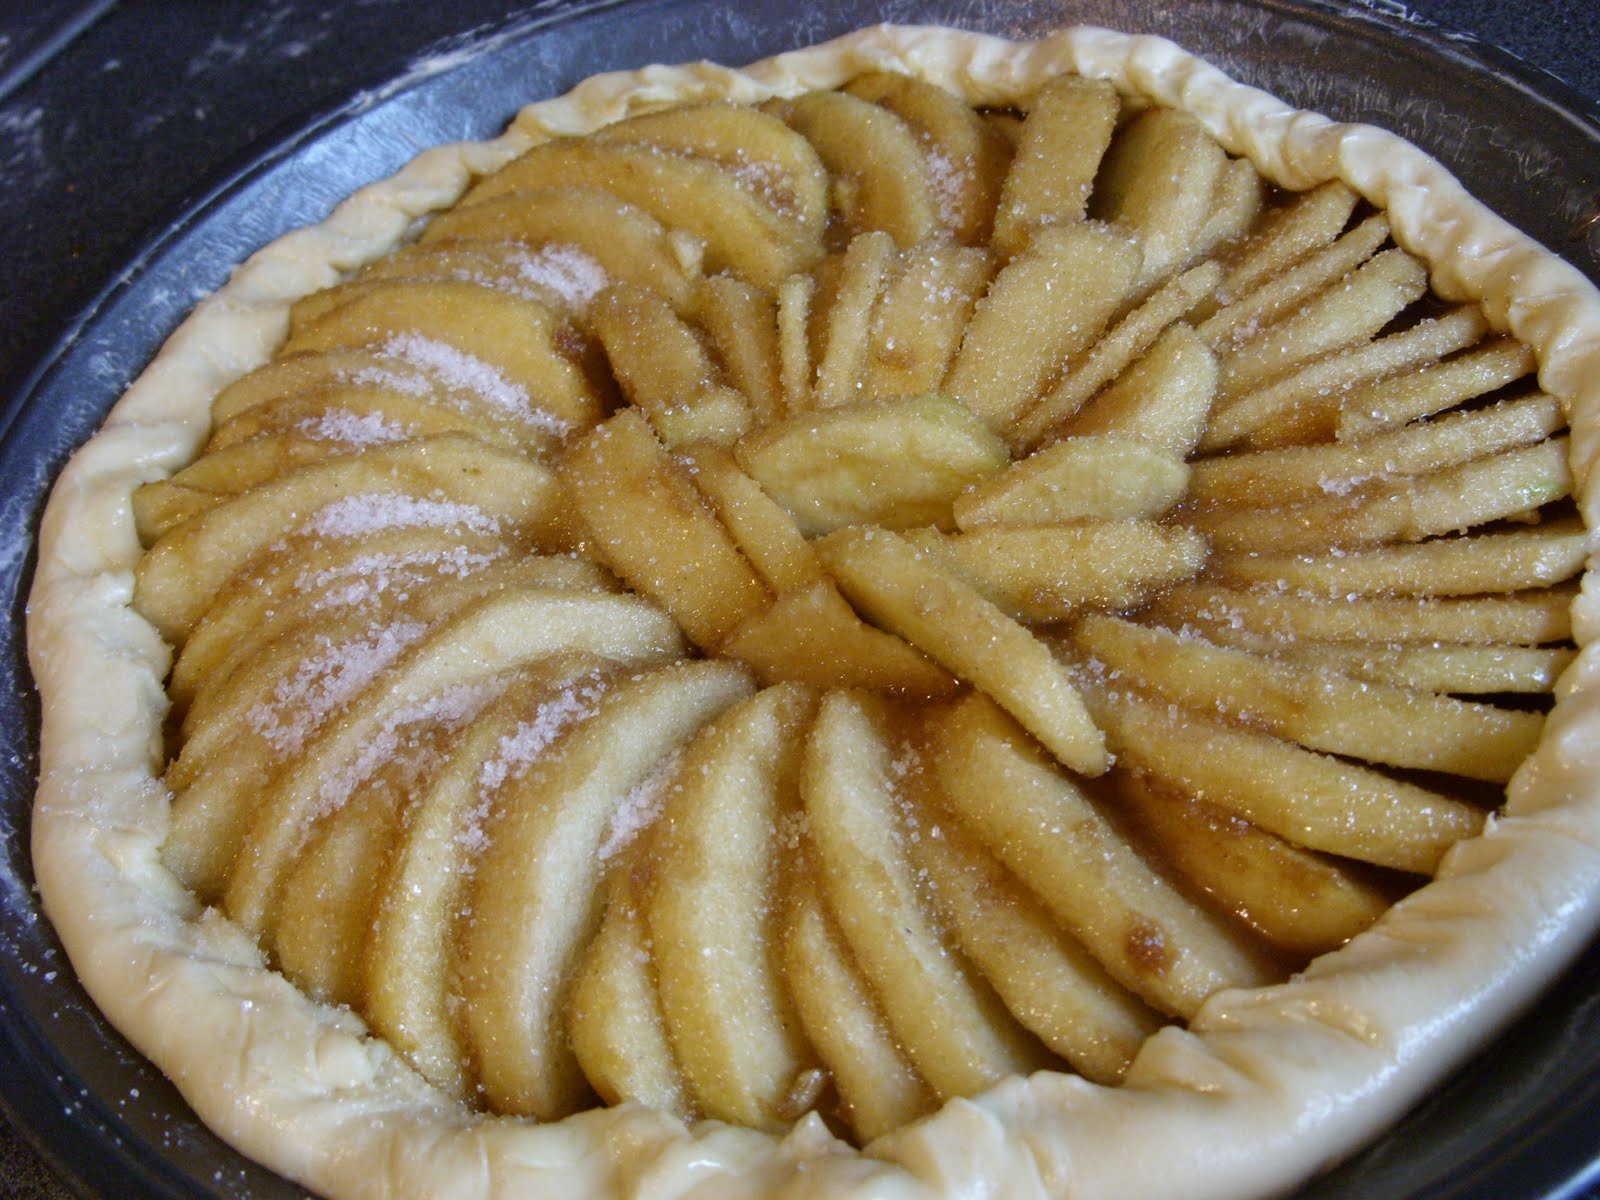
It´s Apple Pie. Original recipe by me. Because I didn´t like the ones I found. Whoohoo!

Ingrediences
for the crust:
250g Flour
175g Margarine
6 TS Ice cold water
1 Egg
a pinch of salt

Filling:

6-8 Apples (I usually take at least two different kinds, sweet and sour)
2 TS Lemonjuice
2 TS Syrup (of any kind. Because Maple syrup is ridiculously expensive over here I use sugar beet molasses because thát´s pretty german, yummy and easy to find.)
100g white Sugar
150g brown Sugar
1 TS ground cinnamon
1 TS Starch
Butter


For the crust mix flour and salt, in little pieces add the margarine. Mix with hands or the handmixer until it´s pretty crumbles. Me I use the machine because I hate, hate, hate the feeling of flour on my hands. Same goes for sand and dry dirt...


Mix the egg with the ice cold water then mix the eggwater with the flour.


It should be a sticky, very soft dough by now. If it´s too sticky, add flour. Stickiness depends on how big the spoon was you measured the water with so... The same goes for the other way around. If it´s too dry and still crumbles, add water.


Now make a pretty ball, divide it in too, wrap in foil and put into the fridge. I usually put my dough into the freezer for 10-15mins, just to make sure it´s all cold and not that soft anymore.


Now for the filling.


Peel the apples if you like, cut them into pieces. If you´re covering your Pie, make them small. This time I didn´t cover it so I just sliced the apples for prettiness.


Put apples into a bowl. Add lemonjuice and syrup. Mix well.

Now add both sugars, cinnamon and the starch. Mix well again.


Butter the Piepan.


Now get the dough out of the fridge. Roll it out. You´ll need two big dough circles.
I usually roll my dough out between baking paper. Again this is because I hate flour on my hands. And I hate cleaning. Using paper keeps my kitchen clean.

It´s also pretty easy to make the second doughcircle as big as the first one because the margerine leaves marks on the paper.


Now put the first doughcircle into a piepan. Or a tarte-pan. Something round looks best, I guess. Poke it a few times with a fork.


But the apples in. If you´re covering the pie make the the apple pile a bit higher towards the middle. Put some little butterflakes on top if you want it extra juicy.


If you want to you can cut out little shapes from the cover layer. I´d absolutely recommend cutting some kinds of holes into it because if you don´t the pie might end up looking like a blow fish because of the hot air and stuff from the filling. I like butterflies.

Put the second doughcircle on top and pinch the two dough layers together. It´s not yummier when it´s pretty. But, well, it´s prettier. If you´re not covering the pie, just tug the apples in and pinch the dough in shape.


Now brush the cover (or just the apples) with some butter, sprinkle it with sugar and into the oven it goes.


Bake for 10mins at 225°C then for 40-45mins at 180°C.
Done. Tastes heavenly fresh out of the oven with vanilla ice cream.


And gone pretty fast, too.

Chocolate Macarons  

Posted by: anna* in , ,

Still more than concerned about Japan. And getting a fundraiser together at Uni (where I study Japanese, mind you) is much more difficult than it should be...

Anyways, distraction.
I had some nice, very inspring talks with my friend Conny from over at Little Design Café lately and among all the craft-talk I mentioned how Macarons weren`t difficult to make and so I said I´d post about it here.

So here´s Chocolate Macarons. Careful: Pretty Chocolaty!

Ingrediences:
120g Powdered Almonds
2 Eggwhites
A pinch of salt
150g Powdered Sugar
2 TS Dutch processed Coacoa

For the Filling:
120g Dark Chocolate
200ml Whipped Cream

Now, doesn´t that list already look like it´s not that hard?
First make sure the almonds are ground to a very fine flour. Sift the almond flour into a bowl.
In another bowl beat the eggwhites with the salt until almost stiff. Add the powdered sugar gradually and keep beating until the egg is really stiff.
With a wire whisk carefully mix in the almonds.
Add the coacoa.
Batter ready. Don´t despair if the egg looses half it´s carefully made stiffness when you add the almonds. It just happens. I was all "Oh nooooo, what now" when this happened to me but it´s natural. Chemistry I guess.
Now preheat the oven at 80°C/32°F.
Fill the batter into an icing bag. Pipe it onto a slighty buttered baking sheet (I used baking paper because I´m lazy...). It has to be even drops, not too high, try not to make points, about as wide as... well, actually as you want them. Just not too big, keep them bite size. Make sure they all are about the same size because they´ll need to fit together.


Bake them for 15-20 minutes. They need to be dry on the upside so: touch them!
Once they are dry turn up the heat to 180°C/176°F and bake them for another 6-10 minutes.
Done. Let them cool. They need to be completely cool when you fill them so... Go read a book or something!
Then you prepare the filling.
Chop the chocolate into small pieces.
Boil up the cream and dissolve the chocolate in it.
Let it cool. (I know, boring, right?)


Cooled it should be a muddy paste, not exactly good looking but very chocolaty.
Whip it (with a handmixer or something) until it stiffens. This can take a little longer that whipping up just the cream.


Now pipe a bit of the filling onto the bottom of one half of the meringue thingies we baked. Put other half on top and gently push together until the filling almost comes out at the sides.


You might need one or two tries to really get how much filling is enough but hey, you can just sample the ones that you feel are not pretty enough to give to others.... And look at how beautiful they look once you got the hang of it. So professional. With so little effort.


They keep for 2-3 days in the fridge once they´re filled but you can also put them in the freezer and produce them whenever you have guests over. Hehehehe...


Yay! Macarons are easy. Don´t be intimidated.
Oh, and I added coconut to mine. Not the best idea so I left it out in the list. Kinda... too... I don´t know.