Soup Week Continued  

Posted by: anna* in , , , ,

Soup Week so far has been fun. I never thought I could eat so much soup. Last time I tried to fast with my mother I had to throw up at the sight of liquid food after two days. Oh, precious memories!
But we´re eating other stuff for breakfast and lunch, so... Yesterday we actually had such a wholesome turkish lunch that we didn´t eat anything else for the rest of the day. No soup.
Today it was Parmesan Soup. Yum!
Ingrediences:
(two servings)
Onion (I used half a big one)
Zucchini (Again: half a big one)
2 medium sized Potatoes
300ml Milk
300ml Instant broth
10 Tortellioni (not self made but freshly made by the not so friendly italian girl...)
100gr Parmesan (fresh, not pre-grounded. That stuff is just nasty!)
Salt
Pepper
1 ts Mustard
Garlic (as much as you like)


Pretty much all my ingrediences minus milk, broth and pasta.


How to:
Dice potatoes, onion, garlic and Zucchini. Put it into a pot and make it sweat. Add the broth and the milk. Let it cook for about 10 minutes then purée it all. The original recipe said to take out some lumps and pieces beforehand and re-add those later but i like it creamy.


In the meantime cook the tortilioni/totolini/ravioli/whatever pleases you. Ours were filled with ricotta and porcini. Fingerlicking good!
Add the grated Parmesan.
Put in bowls or plates or glasses or... (you get the point), add the pasta. Done.
Easy, tasty and it sounds pretty fancy.
Love, anna*

It´s Soup Week!  

Posted by: anna* in , , , ,

It´s been a while. Again. I´m sorry! I was busy first, then busy again and then my back decided it had been too long since my last herniated disc so... Yeah, fun.
But I cooked a little bit and will post about it, I promise.
Now for Soup Week: Nothing big, really. Just me and my sister deciding there were too many good soups for us to try and so we´ll have six days of soup before eating something nasty and oily like spare ribs on sunday.
So Monday brought us:
Potato Soup

Ingrediences:

Potatoes (we used about 8 medium sized ones for two people)
3/4l of Water
Instant broth
Something to give some taste (I used classic german "Kochwurst", thick little sausages, strong in taste and made to be cut into hearty soups or to be eaten with all kinds of cabbages.)

How to:
Pretty easy. Cook the potates. once they´re done, add water and instant broth and smash them real good. We used the immersion blender. Make sure you don´t overdo it, though, because then you don´t get soup but some kind of sticky glue...
Also, I like to keep it a bit... lumpy. But since my sis doesn´t like potato lumps this one is pretty creamy. Sigh.
Cut the sausage in bite size pieces, add to the soup, add some salt and pepper and tadaaa: Potato Soup. Yes, easy. But: Be careful with the salt if your using instant broth!
The blackish stuff you see in the picture? It´s soy sauce. While I know some people who would eat anything with soy sauce (*cough*Jens*cough*), I think it does make soups better.

Yesterday we had the yummy chinese style corn soup that we made here and that has since become one of my favorites.

Later tonight we´ll get a bit more sophisticated with a Parmesan-Zucchini-Soup. More about that tomorrow.

Love, anna

Turkey- rolls and Clafoutis  

Posted by: anna* in , , , , , ,

It´s been a while.
I´ve been quite busy with University stuff... But now it´s the semester break, three heavenly months without classes, just me, work and food. Yay!
My first week off was well spent: I went to a very nice restaurant with my dear friend Mire. They offered an amazing set menue for a fixed price which included a course of wagyu, japanese beef, better known as kobe beef. It was good, I can tell you that much. In taste much closer to wild game than to ordinary german cow. Mmmmh. The other courses were amazing too. I loved the dessert, variations of coffee. Thanks for that supernice evening Mire!!
We didn´t dare to take pictures because it was such a nice restaurant so you´ll just have to trust my words, sorry.
Anyhow. I also got to cook. Last tuesday was my nameday so... Nah, I´m not catholic so actually I shouldn´t care about this particular "holiday" but it brings back pleasant memories from my childhood were my grandma´s italian-catholic neighbor who had the same name as me, Anna, used to bring me supernice presents just for being called "Anna". And I had time so:


I made Turkey-rolls filled with creamcheese with herbs in puff pastry and for dessert we had Clafoutis (which is basically fruit baked in light dough) and homemade ice-cream.
Sounds tricky and highclass? It´s not.

IngrediencesTurkey Rolls:
2 pieces of Turkey
Creamcheese
Herbs
Puff pastry (I´m too lazy to make my own...)

Clafoutis:
1 Egg
20g Butter
40g Sugar
60g Flour
100ml Milk
Baking Powder
Fruits (I used Raspberries & Blackberries)

Icecream:
Icecream machine (my sister got us one two weeks ago)
200ml Milk
125ml Cream
Vanilla
2 large Eggyolks
60g Sugar

How to

Turkey Rolls:Mix herbs with creamcheese, smear on turkey, roll turkey. Put turkey on puff pastry, cover with more puff pastry. Put into the oven for 35-45 minutes at 180°C.


It really is as easy as that. You can maybe add some salt and pepper but I found that the creamcheese was tasty enough.


Ice Cream:
While the turkey was getting ready I had the ice cream machine running. It´s so nice to have one. For this simple icecream you mix the eggyolks and the sugar with the vanilla until it´s all white and foamy. Add the cream.
Heat the milk in a pot, don´t cook it, it just needs to dissolve the sugar that is added when the milk is warm.
Slowly add the egg-sugar-foam.
Let it all cool, then put it into the freezer for 20 minutes. Just don´t forget it, it just needs to cool.
Mix once again then let the icecream machine do it´s job for 35-40 minutes.

Clafoutis:


Melt the butter and mix it with the egg, sugar, milk and vanilla sugar. Carefully add the flour and the baking powder.


Put the fruits into some kind of buttered pie pan, pour the mix over it and then let it sit in the oven for about 35 minutes at 180°C.


To butter cake pans and the like I usually use a little plastic bag like a glove, grab some butter with it and when I´m done I just throw it away. Not an important trick but one that, I happen to know, is not known to all mankind....


Mmmmh, doesn´t that look great, even in that crappy picture?


I served the Clafoutis hot together with the ice cream. It was pure heaven.


Excuse the pictures. My dear brother took the good camera with him on a hiking trip so I have to make do with my own. Not happy. I miss the good camera.

Cinnamon Pull Apart Bread  

Posted by: anna* in , ,

Here´s some yeasty awesomeness: I used this recipe from over at Joy the Baker and it worked great so: use it. Not hard to do (as usual), very handsome and incredibly yummy! I didn´t even have to alter anything, really. I thought about using the yeast dice you usually gt over here instead of the dry yeast but then decided against it and stick to the recipe. It was my first time using dry yeast and I was happy with it.


Yeast dough always reminds me of my early childhood where my grandma used to make a lot of sweets with yeast dough. I loved sneaking into the kitchen, stealing little pieces of the lukewarm dough, I loved the smell of it and everything my grandma made from it. And this Pull Apart Bread is pure love, too. Go ahead, make it!

Ingrediences:
For the Dough:
2 3/4 Cups all purpose Flour (330gr)
1/4 Cup Sugar (55 gr)
2 1/4 ts Active Dry Yeast
1/2 ts Salt
2 ounces Butter (60gr)
1/3 Cup Milk
1/4 Cup Water
2 large Eggs (at roomtemperature)
1 ts Vanilla extract

For the "Filling":
1 Cup Sugar (220gr)
2 ts ground Cinnamon
1/2 ts ground Nutmeg
2 ounces Butter (60gr)

If you need a converter for cooking measurements these are the ones I usually use:
convert-me.com , onlineconversion.com and for germans: usa-kulinarisch.de


Here we go:

Mix 2 Cups of flour, the yeast, salt and sugar for the dough in a bowl and set aside.
Whisk the eggs together and set aside, too.
Warm up the milk (no cooking needed) and let the butter melt in it.
Add the water and the vanilla extract to the mil and butter.
Let it cool down to about 50°C/115-125°F. For me that didn´t mean letting it cool down because it never got that hot in the first place. I´m used to handling things lukewarm when dealing with yeast.

Now the milk mixture goes into the flour mixture. Joy says to mix with a spatula. But remembering my hate of floury hands I used the handmixer. Worked great.
Add the eggs. That´s what I call gooey. It really takes a minute or two to get everything mixed together and then it looks... well... not pretty.
Add the remaining flour, mix and let the very sticky dough rest for about an hour. Make sure it´s covered and in a nice warm place. On a sunshiny day I put my dough on the windowsill and hope that someone walks by and thinks "Oooh! Dough! Nice!" Never happens because I live on the fourth floor...


While the dough rose I watched cartoons. I can recommend that.
<-- Dough before rising.


An hour later:
Put together the sugar, nutmeg and cinnamon for the filling.
Butter your cakepan. Let the butter melt and get a bit brown. Watch out because butter is a bitch: it refuses to get brown when you watch. You look away and suddenly it´s all black...

<-- Dough after rising.
Deflate the dough by kneading it. Add two tablespoons of flour to it to get rid of the stickiness.


Let it rise for another 5 mins.


As usual I didn´t flour my work surface but used baking paper to roll out the dough. Try to make it rectangle shaped if you can. I couldn´t.


Butter it. It´s easiest with a pastry brush.


Then sprinkle all the sugar mix over it. It doesn´t look like much when you´ve got in in a little bowl but it seems like and endless supply when you´re sprinkling... I actually didn´t use all of it. I thought the dough would die of diabetes...

Cut the dough into stripes. Joy made six, I only made 5 and those weren´t particularly good looking. Or evenly shaped. Or anything else.


Stack the stripes, then cut them into little piles. I made six piles. I thought I´d never fill the pan with this...


But I did. Put the stacks/piles into your cake pan. Set it aside and let it rise for another 30-45mins. It´s supposed to double it´s size but it didn´t. It did rise notably, though so I figured it`s be ok.


Sugary, yeasty pull-apart-leaves to be...


Let it bake for about 45min at 175°C/ 350°F. I think it took me a while longer because my oven sucks. But: Make sure the top is a yummy golden brown. Yeast doughs are tricky and they can look good on the outside while still all gooey on the inside.


Mmmh, yum! It does taste good the day after but certainly is most amazing when its fresh. Just let it rest after baking for about half an hour, then eat. Yes, it is pretty buttery but... who cares!


Easy Apple Pie  

Posted by: anna* in , , ,

It´s weekend, fun time. And I´m sick. Instead of having fun, I´ll stay in. So I might as well tell the world about some cake I made. 
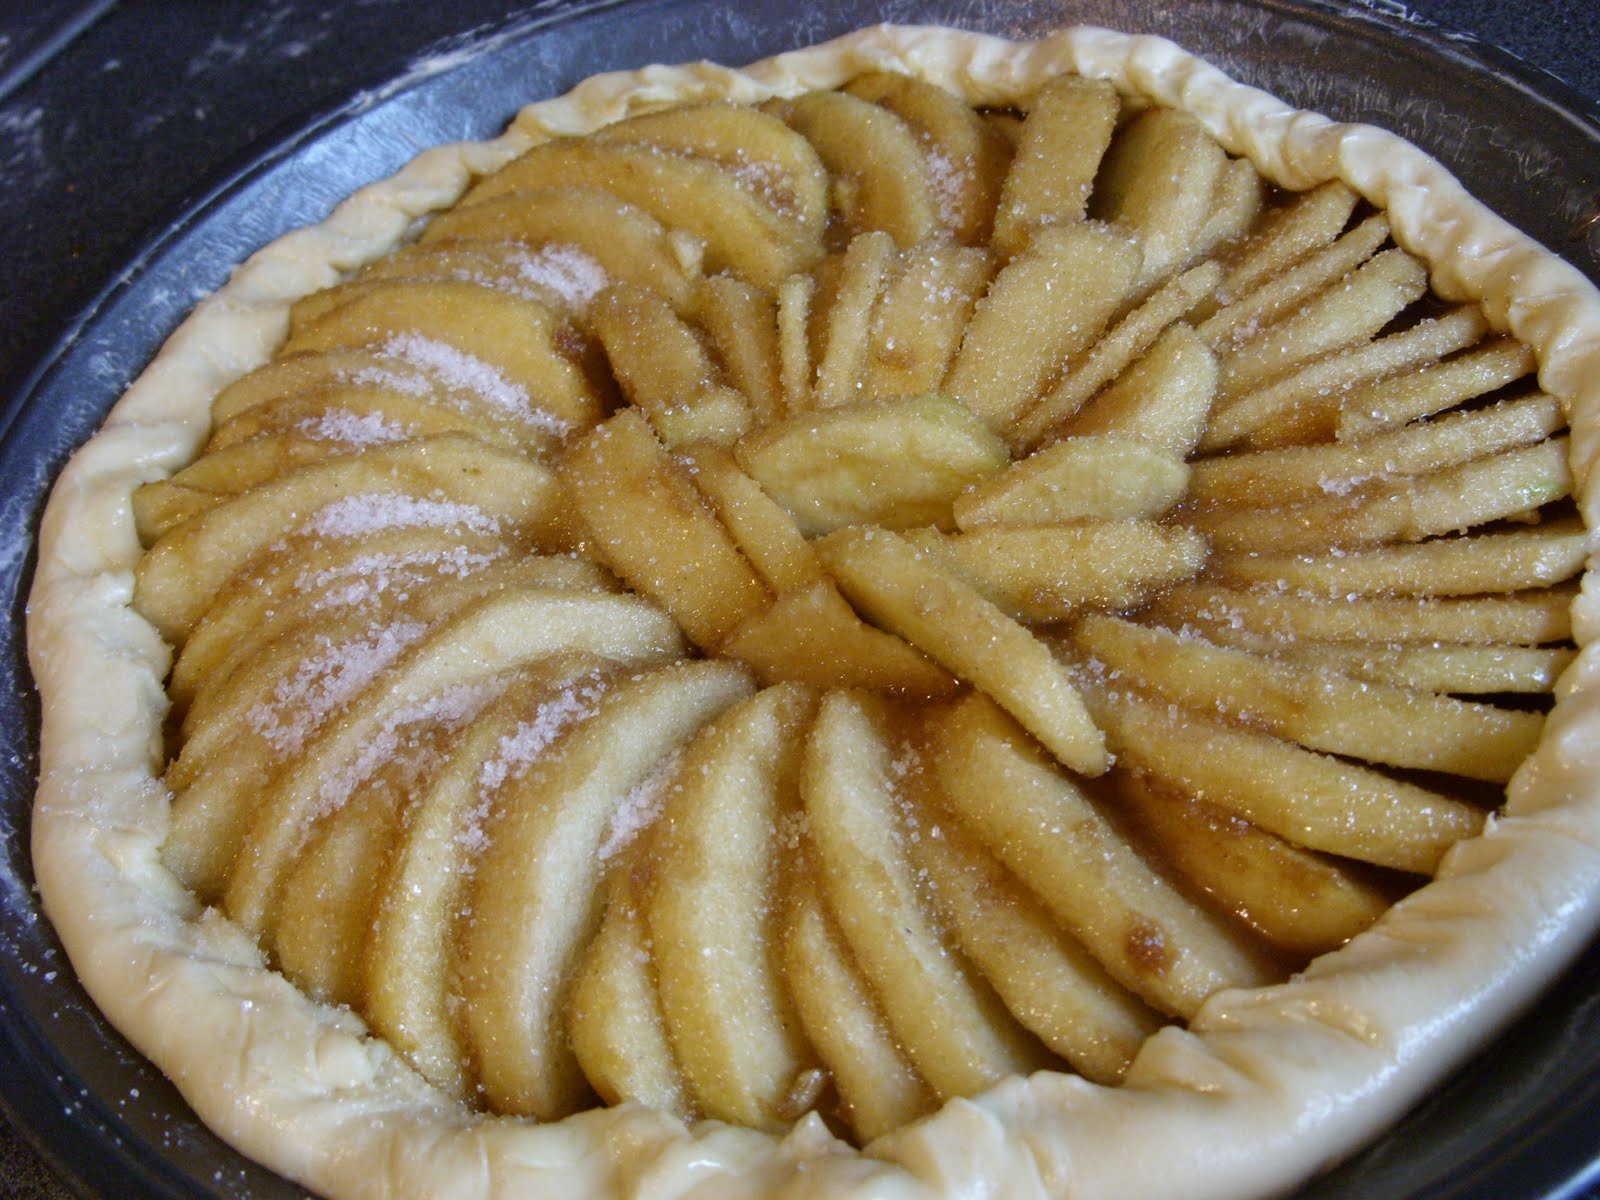
It´s Apple Pie. Original recipe by me. Because I didn´t like the ones I found. Whoohoo!

Ingrediences
for the crust:
250g Flour
175g Margarine
6 TS Ice cold water
1 Egg
a pinch of salt

Filling:

6-8 Apples (I usually take at least two different kinds, sweet and sour)
2 TS Lemonjuice
2 TS Syrup (of any kind. Because Maple syrup is ridiculously expensive over here I use sugar beet molasses because thát´s pretty german, yummy and easy to find.)
100g white Sugar
150g brown Sugar
1 TS ground cinnamon
1 TS Starch
Butter


For the crust mix flour and salt, in little pieces add the margarine. Mix with hands or the handmixer until it´s pretty crumbles. Me I use the machine because I hate, hate, hate the feeling of flour on my hands. Same goes for sand and dry dirt...


Mix the egg with the ice cold water then mix the eggwater with the flour.


It should be a sticky, very soft dough by now. If it´s too sticky, add flour. Stickiness depends on how big the spoon was you measured the water with so... The same goes for the other way around. If it´s too dry and still crumbles, add water.


Now make a pretty ball, divide it in too, wrap in foil and put into the fridge. I usually put my dough into the freezer for 10-15mins, just to make sure it´s all cold and not that soft anymore.


Now for the filling.


Peel the apples if you like, cut them into pieces. If you´re covering your Pie, make them small. This time I didn´t cover it so I just sliced the apples for prettiness.


Put apples into a bowl. Add lemonjuice and syrup. Mix well.

Now add both sugars, cinnamon and the starch. Mix well again.


Butter the Piepan.


Now get the dough out of the fridge. Roll it out. You´ll need two big dough circles.
I usually roll my dough out between baking paper. Again this is because I hate flour on my hands. And I hate cleaning. Using paper keeps my kitchen clean.

It´s also pretty easy to make the second doughcircle as big as the first one because the margerine leaves marks on the paper.


Now put the first doughcircle into a piepan. Or a tarte-pan. Something round looks best, I guess. Poke it a few times with a fork.


But the apples in. If you´re covering the pie make the the apple pile a bit higher towards the middle. Put some little butterflakes on top if you want it extra juicy.


If you want to you can cut out little shapes from the cover layer. I´d absolutely recommend cutting some kinds of holes into it because if you don´t the pie might end up looking like a blow fish because of the hot air and stuff from the filling. I like butterflies.

Put the second doughcircle on top and pinch the two dough layers together. It´s not yummier when it´s pretty. But, well, it´s prettier. If you´re not covering the pie, just tug the apples in and pinch the dough in shape.


Now brush the cover (or just the apples) with some butter, sprinkle it with sugar and into the oven it goes.


Bake for 10mins at 225°C then for 40-45mins at 180°C.
Done. Tastes heavenly fresh out of the oven with vanilla ice cream.


And gone pretty fast, too.

Pillowcases  

Posted by: anna* in ,

No food today. Well, at least not here.

I spent the weekend with sewing inbetween checking for updates from Fukushima.
Pillowcases I made. And stamps for decorating them.


My material: kitchen towels, the kind of linoleum you use when you´re feeling artsy.


Cut towel. I used most of it for these 35cm pillowcases (made to fit the little babyblue pillows you get for little money at that one big swedish furniture store...)


Pinned together with pins.


Still only pinned. I always need to make sure everything really fits so I put the pillow in. Fits.


Sewn. It´s one single seam really because the towels are already seamed. The flap is already nicely seamed, inside and out. Less work=more fun.


My materials pt.2. The stamps (5 of them), fabric paint (black), a roller that came with my linolum kit, old newspapers to protect my pretty floor, old newspapers to put inside the pillowcases because the paint bleeds through, rubber gloves.


My stamps. The yellow one is cut from foam rubber. I wanted to try both. My favorite is the dancing monkey.


Here we go. I kinda like them. Now, what can I do with ten pillowcases?


The fruits.


Well, that was easy once again. I hope you don´t mind that this isn´t really a tutorial... I´m betting there are people out there that can explain how to sew a pillowcase much better than me.
Next will be more food, I promise.

Chocolate Macarons  

Posted by: anna* in , ,

Still more than concerned about Japan. And getting a fundraiser together at Uni (where I study Japanese, mind you) is much more difficult than it should be...

Anyways, distraction.
I had some nice, very inspring talks with my friend Conny from over at Little Design Café lately and among all the craft-talk I mentioned how Macarons weren`t difficult to make and so I said I´d post about it here.

So here´s Chocolate Macarons. Careful: Pretty Chocolaty!

Ingrediences:
120g Powdered Almonds
2 Eggwhites
A pinch of salt
150g Powdered Sugar
2 TS Dutch processed Coacoa

For the Filling:
120g Dark Chocolate
200ml Whipped Cream

Now, doesn´t that list already look like it´s not that hard?
First make sure the almonds are ground to a very fine flour. Sift the almond flour into a bowl.
In another bowl beat the eggwhites with the salt until almost stiff. Add the powdered sugar gradually and keep beating until the egg is really stiff.
With a wire whisk carefully mix in the almonds.
Add the coacoa.
Batter ready. Don´t despair if the egg looses half it´s carefully made stiffness when you add the almonds. It just happens. I was all "Oh nooooo, what now" when this happened to me but it´s natural. Chemistry I guess.
Now preheat the oven at 80°C/32°F.
Fill the batter into an icing bag. Pipe it onto a slighty buttered baking sheet (I used baking paper because I´m lazy...). It has to be even drops, not too high, try not to make points, about as wide as... well, actually as you want them. Just not too big, keep them bite size. Make sure they all are about the same size because they´ll need to fit together.


Bake them for 15-20 minutes. They need to be dry on the upside so: touch them!
Once they are dry turn up the heat to 180°C/176°F and bake them for another 6-10 minutes.
Done. Let them cool. They need to be completely cool when you fill them so... Go read a book or something!
Then you prepare the filling.
Chop the chocolate into small pieces.
Boil up the cream and dissolve the chocolate in it.
Let it cool. (I know, boring, right?)


Cooled it should be a muddy paste, not exactly good looking but very chocolaty.
Whip it (with a handmixer or something) until it stiffens. This can take a little longer that whipping up just the cream.


Now pipe a bit of the filling onto the bottom of one half of the meringue thingies we baked. Put other half on top and gently push together until the filling almost comes out at the sides.


You might need one or two tries to really get how much filling is enough but hey, you can just sample the ones that you feel are not pretty enough to give to others.... And look at how beautiful they look once you got the hang of it. So professional. With so little effort.


They keep for 2-3 days in the fridge once they´re filled but you can also put them in the freezer and produce them whenever you have guests over. Hehehehe...


Yay! Macarons are easy. Don´t be intimidated.
Oh, and I added coconut to mine. Not the best idea so I left it out in the list. Kinda... too... I don´t know.

Fondant  

Posted by: anna* in , ,

I´m all worried about the earthquake in Japan... So I decided to post here to get my mind off things.


I´ve always wanted to try messing with fondant. My lovely sister gave me Fondant for Christmas and so...
Maaaan, it´s kinda... exhausting. I think it´s better if you know what you´re doing, have a plan or a theme and just do what you wanted. But. I didn´t have a plan, I didn´t have a theme and so both my attempts at trying to make cupcakes pretty ended with only a few cupcakes.

Here are some pictures:


This first batch I made all by myself.
I also got a leave-mold. Nice.


My first try at making a rose. Kinda big...


Mini Cupcake turned upside down then covered. Not looking too good. But I like the idea.


All (four) of them. It took me about 1 1/2 hours to make those. I need more practise.


The second batch I made with my friend Conny. I figured it`d be more fun doing it together. And it was. But still we didn´t manage to make lots. Yes, we did spend probably too much time chatting like old women but still...


Fondant flowers. Cut out with Japanese cutters.


A ribbon. It looks so easy. I can tell you, it´s not.


White on white. Very elegant if you ask me.


Another rose. Smaller this time and with a leaf.


Conny`s beautiful daughter Supercute-Sophia being proud of her cupcake. She loved the Leaf-mold.


That is all we made. Two big ones, two little ones each.


Next time we´ll make more. We´ll make a plan beforehand and don´t try to think of cute things while we´re at it. We absolutely won´t forget the stars! We will use unpowdered gloves for kneading and modelling the fondant. We will have more little cookie cutters. We will make better cupcakes (the little ones were terribly dry). We... Well, we´ll just make it better. Right? Right!