Showing posts with label cake. Show all posts

Rhubarb, Baby!  

Posted by: anna* in , , , , , ,

It´s Rhubarb season! It doesn´t look much like spring and the weather has been crazy from bitter cold to moist and warm but I want it to be spring now. So I felt like I should make something rhubarb-y. But I have never made anything from or with rhubarb ever before. I did, however, always like a good rhubarb cake, something that suddenly strikes me as incredibly german. 
Because I felt it would be fun and to keep them busy (because two kids each isn´t enough?) I challenged two friends to make something with rhubarb as well. How are you girls doing? :D 

Here´s what I made: 

Coconut-Rhubarb-Cake

Ingredients
100g Rhubarb
75g Flour
50g shredded Coconut
2 Eggs
100g Sugar
40g Butter (room temperature)

Vanilla Essence if you like
Butter for the pan

This was enough for me to make a small cake, if you want a bigger one, please ajust the measurements accordingly. The original recipe I altered here used 4 times as much as I did so I guess that should make one big cake.

How to
First: Preheat the oven to 180°C.
Rhubarb!
Like I said this was my first time working with rhubarb. Google told me not to peel it when it was young and "tender", like it would be early in the season but to absolutely peel it when it was "stronger" later on. Well, you funny internet-people, I have no clue how to tell those two conditions apart if I have never seen either so I peeled the thingies anyway. Can`t hurt, right? 
The peeling proved to be fairly easy but stringy, just like peeling asparagus.
So: peel and cut Rhubarb.
Peeled and cut.
Put flour and shredded coconut in a bowl, mix well, add the cut rhubarb. 
I for my part like my coconut powdery and not stuck between my teeth so I shredded it even finer in the blender beforehand. Not as fine as flour but... well, finer than what the store sells. I just think that this makes coconut things easier to eat. 
Next seperate the eggs and beat the eggwhites. When it starts to get stiff, add half the sugar. 
Now mix the eggyolks with the butter and the other half of the sugar. It should be all foamy and looking very yummy (but really it´s just very buttery... and I really don´t like butter.>_<).
If you would like to, add a touch of vanilla essence here.
 Butter, sugar, eggyolks...
...all foamy.
Carefully fold in the eggwhite-sugar into the butter-sugar stuff. Sounds easier than it is because butter will be butter and hence not very cooperative. Be careful not to lose all the eggwhite fluffiness. 
Almost batter.
Now fold in the rhubarb-flour mix. Again. Carefully, please. Because there is no baking powder or soda in this recipe the fluffiness from the eggwhites is all the fluffiness this cake will have.  (Fluffiness is a funny word. I like it, did you notice? Fluffy, fluffy, fluffiness!)
I tend to get impatient and angry at batters not combining as I would like them to and then just beat the crap out of everything... Not very wise. I did an okay job this time, though.
Batter that made the cake.
That was pretty much it already. Now put the batter in a well buttered cake pan and put in the oven. 
Almost cake now.
For quite some time! Since the original four-times-as-much-recipe said to leave it in for almost two hours I figured I´d start with 50 minutes. After this time I checked the cake, found it still partially liquid inside so then I covered the cake with aluminium foil and gave it another 20 minutes. 
I left it in for 1 hour 10 minutes
Maybe a bit much, the sides were a bit burnt. Maybe try 10 mins less? 
 The cake! 
I liked this cake. A lot. The coconut came out nicely but without taking away any attention from our leading man, the rhubarb. I wish I had used a bit more of that, though. 
It did turn out moist and fluffy and makes a great spring cake. Not too light and summery but not a heavy winter food, either. I´m betting it`s super yummy with some whipped cream...
Cake!
I liked it. Go try it yourself. Or: try something else with rhubarb. I´d be glad to hear about everyone elses experiments. ^^
Thanks for reading. 
Love,
a*

PS: Fun fact: Rhubarb is officially a vegetable in Germany while in the US it has been classifed as a fruit in 1947.

Turkey- rolls and Clafoutis  

Posted by: anna* in , , , , , ,

It´s been a while.
I´ve been quite busy with University stuff... But now it´s the semester break, three heavenly months without classes, just me, work and food. Yay!
My first week off was well spent: I went to a very nice restaurant with my dear friend Mire. They offered an amazing set menue for a fixed price which included a course of wagyu, japanese beef, better known as kobe beef. It was good, I can tell you that much. In taste much closer to wild game than to ordinary german cow. Mmmmh. The other courses were amazing too. I loved the dessert, variations of coffee. Thanks for that supernice evening Mire!!
We didn´t dare to take pictures because it was such a nice restaurant so you´ll just have to trust my words, sorry.
Anyhow. I also got to cook. Last tuesday was my nameday so... Nah, I´m not catholic so actually I shouldn´t care about this particular "holiday" but it brings back pleasant memories from my childhood were my grandma´s italian-catholic neighbor who had the same name as me, Anna, used to bring me supernice presents just for being called "Anna". And I had time so:


I made Turkey-rolls filled with creamcheese with herbs in puff pastry and for dessert we had Clafoutis (which is basically fruit baked in light dough) and homemade ice-cream.
Sounds tricky and highclass? It´s not.

IngrediencesTurkey Rolls:
2 pieces of Turkey
Creamcheese
Herbs
Puff pastry (I´m too lazy to make my own...)

Clafoutis:
1 Egg
20g Butter
40g Sugar
60g Flour
100ml Milk
Baking Powder
Fruits (I used Raspberries & Blackberries)

Icecream:
Icecream machine (my sister got us one two weeks ago)
200ml Milk
125ml Cream
Vanilla
2 large Eggyolks
60g Sugar

How to

Turkey Rolls:Mix herbs with creamcheese, smear on turkey, roll turkey. Put turkey on puff pastry, cover with more puff pastry. Put into the oven for 35-45 minutes at 180°C.


It really is as easy as that. You can maybe add some salt and pepper but I found that the creamcheese was tasty enough.


Ice Cream:
While the turkey was getting ready I had the ice cream machine running. It´s so nice to have one. For this simple icecream you mix the eggyolks and the sugar with the vanilla until it´s all white and foamy. Add the cream.
Heat the milk in a pot, don´t cook it, it just needs to dissolve the sugar that is added when the milk is warm.
Slowly add the egg-sugar-foam.
Let it all cool, then put it into the freezer for 20 minutes. Just don´t forget it, it just needs to cool.
Mix once again then let the icecream machine do it´s job for 35-40 minutes.

Clafoutis:


Melt the butter and mix it with the egg, sugar, milk and vanilla sugar. Carefully add the flour and the baking powder.


Put the fruits into some kind of buttered pie pan, pour the mix over it and then let it sit in the oven for about 35 minutes at 180°C.


To butter cake pans and the like I usually use a little plastic bag like a glove, grab some butter with it and when I´m done I just throw it away. Not an important trick but one that, I happen to know, is not known to all mankind....


Mmmmh, doesn´t that look great, even in that crappy picture?


I served the Clafoutis hot together with the ice cream. It was pure heaven.


Excuse the pictures. My dear brother took the good camera with him on a hiking trip so I have to make do with my own. Not happy. I miss the good camera.

Cinnamon Pull Apart Bread  

Posted by: anna* in , ,

Here´s some yeasty awesomeness: I used this recipe from over at Joy the Baker and it worked great so: use it. Not hard to do (as usual), very handsome and incredibly yummy! I didn´t even have to alter anything, really. I thought about using the yeast dice you usually gt over here instead of the dry yeast but then decided against it and stick to the recipe. It was my first time using dry yeast and I was happy with it.


Yeast dough always reminds me of my early childhood where my grandma used to make a lot of sweets with yeast dough. I loved sneaking into the kitchen, stealing little pieces of the lukewarm dough, I loved the smell of it and everything my grandma made from it. And this Pull Apart Bread is pure love, too. Go ahead, make it!

Ingrediences:
For the Dough:
2 3/4 Cups all purpose Flour (330gr)
1/4 Cup Sugar (55 gr)
2 1/4 ts Active Dry Yeast
1/2 ts Salt
2 ounces Butter (60gr)
1/3 Cup Milk
1/4 Cup Water
2 large Eggs (at roomtemperature)
1 ts Vanilla extract

For the "Filling":
1 Cup Sugar (220gr)
2 ts ground Cinnamon
1/2 ts ground Nutmeg
2 ounces Butter (60gr)

If you need a converter for cooking measurements these are the ones I usually use:
convert-me.com , onlineconversion.com and for germans: usa-kulinarisch.de


Here we go:

Mix 2 Cups of flour, the yeast, salt and sugar for the dough in a bowl and set aside.
Whisk the eggs together and set aside, too.
Warm up the milk (no cooking needed) and let the butter melt in it.
Add the water and the vanilla extract to the mil and butter.
Let it cool down to about 50°C/115-125°F. For me that didn´t mean letting it cool down because it never got that hot in the first place. I´m used to handling things lukewarm when dealing with yeast.

Now the milk mixture goes into the flour mixture. Joy says to mix with a spatula. But remembering my hate of floury hands I used the handmixer. Worked great.
Add the eggs. That´s what I call gooey. It really takes a minute or two to get everything mixed together and then it looks... well... not pretty.
Add the remaining flour, mix and let the very sticky dough rest for about an hour. Make sure it´s covered and in a nice warm place. On a sunshiny day I put my dough on the windowsill and hope that someone walks by and thinks "Oooh! Dough! Nice!" Never happens because I live on the fourth floor...


While the dough rose I watched cartoons. I can recommend that.
<-- Dough before rising.


An hour later:
Put together the sugar, nutmeg and cinnamon for the filling.
Butter your cakepan. Let the butter melt and get a bit brown. Watch out because butter is a bitch: it refuses to get brown when you watch. You look away and suddenly it´s all black...

<-- Dough after rising.
Deflate the dough by kneading it. Add two tablespoons of flour to it to get rid of the stickiness.


Let it rise for another 5 mins.


As usual I didn´t flour my work surface but used baking paper to roll out the dough. Try to make it rectangle shaped if you can. I couldn´t.


Butter it. It´s easiest with a pastry brush.


Then sprinkle all the sugar mix over it. It doesn´t look like much when you´ve got in in a little bowl but it seems like and endless supply when you´re sprinkling... I actually didn´t use all of it. I thought the dough would die of diabetes...

Cut the dough into stripes. Joy made six, I only made 5 and those weren´t particularly good looking. Or evenly shaped. Or anything else.


Stack the stripes, then cut them into little piles. I made six piles. I thought I´d never fill the pan with this...


But I did. Put the stacks/piles into your cake pan. Set it aside and let it rise for another 30-45mins. It´s supposed to double it´s size but it didn´t. It did rise notably, though so I figured it`s be ok.


Sugary, yeasty pull-apart-leaves to be...


Let it bake for about 45min at 175°C/ 350°F. I think it took me a while longer because my oven sucks. But: Make sure the top is a yummy golden brown. Yeast doughs are tricky and they can look good on the outside while still all gooey on the inside.


Mmmh, yum! It does taste good the day after but certainly is most amazing when its fresh. Just let it rest after baking for about half an hour, then eat. Yes, it is pretty buttery but... who cares!


Easy Apple Pie  

Posted by: anna* in , , ,

It´s weekend, fun time. And I´m sick. Instead of having fun, I´ll stay in. So I might as well tell the world about some cake I made. 
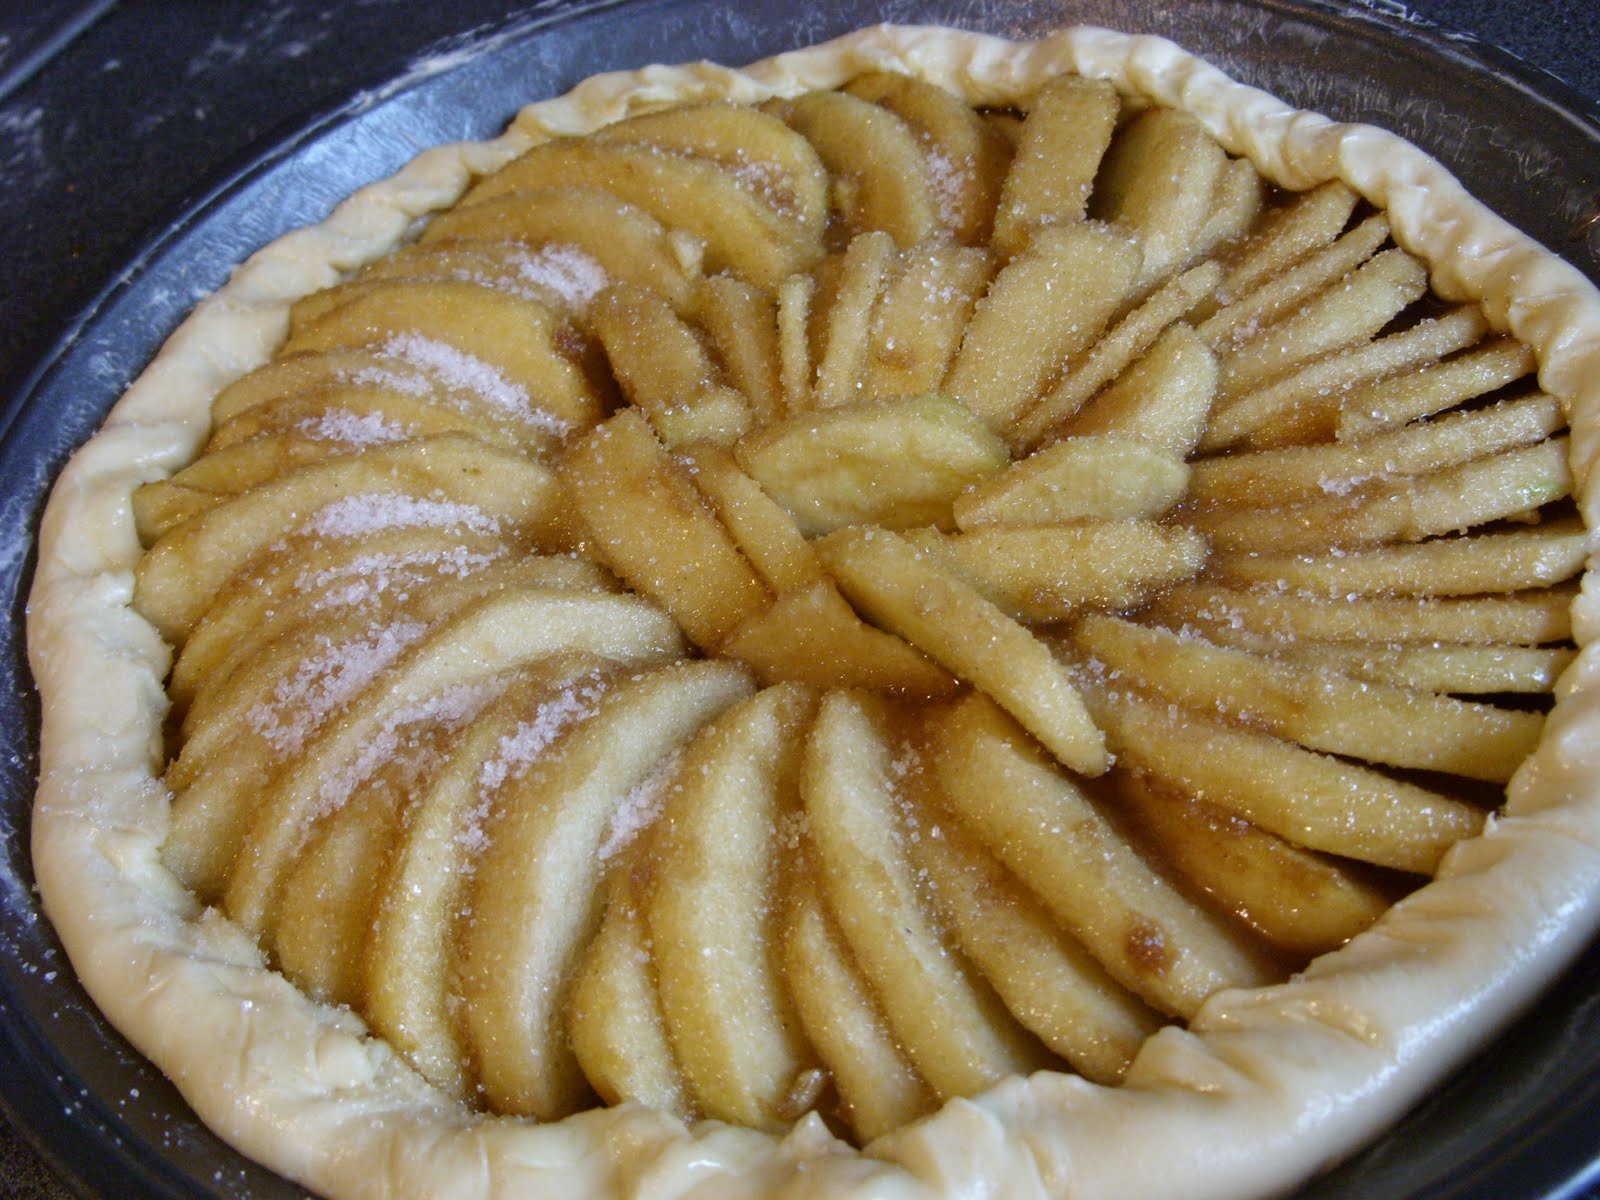
It´s Apple Pie. Original recipe by me. Because I didn´t like the ones I found. Whoohoo!

Ingrediences
for the crust:
250g Flour
175g Margarine
6 TS Ice cold water
1 Egg
a pinch of salt

Filling:

6-8 Apples (I usually take at least two different kinds, sweet and sour)
2 TS Lemonjuice
2 TS Syrup (of any kind. Because Maple syrup is ridiculously expensive over here I use sugar beet molasses because thát´s pretty german, yummy and easy to find.)
100g white Sugar
150g brown Sugar
1 TS ground cinnamon
1 TS Starch
Butter


For the crust mix flour and salt, in little pieces add the margarine. Mix with hands or the handmixer until it´s pretty crumbles. Me I use the machine because I hate, hate, hate the feeling of flour on my hands. Same goes for sand and dry dirt...


Mix the egg with the ice cold water then mix the eggwater with the flour.


It should be a sticky, very soft dough by now. If it´s too sticky, add flour. Stickiness depends on how big the spoon was you measured the water with so... The same goes for the other way around. If it´s too dry and still crumbles, add water.


Now make a pretty ball, divide it in too, wrap in foil and put into the fridge. I usually put my dough into the freezer for 10-15mins, just to make sure it´s all cold and not that soft anymore.


Now for the filling.


Peel the apples if you like, cut them into pieces. If you´re covering your Pie, make them small. This time I didn´t cover it so I just sliced the apples for prettiness.


Put apples into a bowl. Add lemonjuice and syrup. Mix well.

Now add both sugars, cinnamon and the starch. Mix well again.


Butter the Piepan.


Now get the dough out of the fridge. Roll it out. You´ll need two big dough circles.
I usually roll my dough out between baking paper. Again this is because I hate flour on my hands. And I hate cleaning. Using paper keeps my kitchen clean.

It´s also pretty easy to make the second doughcircle as big as the first one because the margerine leaves marks on the paper.


Now put the first doughcircle into a piepan. Or a tarte-pan. Something round looks best, I guess. Poke it a few times with a fork.


But the apples in. If you´re covering the pie make the the apple pile a bit higher towards the middle. Put some little butterflakes on top if you want it extra juicy.


If you want to you can cut out little shapes from the cover layer. I´d absolutely recommend cutting some kinds of holes into it because if you don´t the pie might end up looking like a blow fish because of the hot air and stuff from the filling. I like butterflies.

Put the second doughcircle on top and pinch the two dough layers together. It´s not yummier when it´s pretty. But, well, it´s prettier. If you´re not covering the pie, just tug the apples in and pinch the dough in shape.


Now brush the cover (or just the apples) with some butter, sprinkle it with sugar and into the oven it goes.


Bake for 10mins at 225°C then for 40-45mins at 180°C.
Done. Tastes heavenly fresh out of the oven with vanilla ice cream.


And gone pretty fast, too.

Weekendfood! Wochenendessen!  

Posted by: anna* in , , , , , ,

Quite a weekend, foodwise. I didn´t cook much myself... Yay! It started out on friday:
Was für ein Wochenende, essensmäßig. Ich hab nicht viel selbst gekocht... Yay! Es fing am Freitag an:
With my tandem partner, the lovely M, I went to the "Matsumi", a good but fairly expensive japanese restaurant in town. It´s affordable for lunch, though. Had teriyaki salmon. With tsukemono, salad, rice and miso. Mmmh.... 12€
Mit meiner bezaubernden Tandempartnerin M war ich im "Matsumi", einem recht teuren aber guten japanischen Restaurant. Man kann es sich zu Mittag durchaus leisten. Wir hatten teriyaki Lachs. Mit Reis, Tsukemono, Salat und Miso. Mmmh... 12€
M brought me carob chocolate from Sicily. Very chocolaty. Yum!
M hat mir Johannisbrot Schokolade aus Sizilien mitgebracht. Sehr schokoladig. Mmmh. 12€
持って来てくれたありがとうございました!:)


On saturday we had our 11yr old babysister over and dragged her to this lovely café called "Prinsessan". It´s really cute and in the afternoons you can get a 3 course dessert set menu. Nice. I had this Cheese-Pear-Cake and a fresh Mint-Tea.The cake was good. Not too sweet and very fluffy. I´m going back for the set Menu.
Am Samstag hatten wir unsere 11jährige Babyschwester zu besuch und haben sie in dieses niedliche Café namens "Prinsessan" gezerrt. Es ist wirklich süß und am Nachmittag kann man da drei-Gänge-Dessert-Menüs essen. Cool. Ich hatte diesen Käse-Birnen-Kuchen und einen frischen Minz-Tea. Der Kuchen war gut. Nicht so süß und sehr fluffig. Ich geh nochmal hin für das Menü.

We also bought these macarons there. Vanilla, Mango/Passionfruit and Chocolate. Haven´t tried them yet. Making macarons myself is on my to-do-list, though...
Wir haben da auch diese Macarons gekauft. Vanilla, Mango/Passionsfrucht und Schokolade. Haben sie noch nicht probiert. Selber Macarons machen ist aber auf meiner To-Do-Liste...
Last but not least: Dina`s food! Brussel sprouts, mashed potatoes, beef, green beans and two kinds of gravy, one with chanterelles (still sounds italian to me...:D) and one made from the beef juice with garlic and chilli. It was gorgeous! Dina stayed at C&A`s place and we were invited over for her magic food and fun. Thanks again, guys.
I hardly get the chance to eat brussel sprouts because the sister (that I live with) hates them so...even better.
Zu guter Letzt: Dinas Essen. Rosenkohl, Kartoffelbrei, Rind, grüne Bohnen und zwei Soßen, eine mit Pfifferlingen, eine aus dem Bratensaft mit Knoblauch und Chilli. Es war traumhauft! Dina war bei C&A zu Besuch und wir waren eingeladen zu ihrem magischen Essen und Spaß. Danke nochmal, Leute.
Ich bekomme selten die Gelegenheit Rosenkohl zu essen weil die Schwester (mit der ich lebe) sie hasst, also... noch besser.
And: Happy Birthday Brother!!

Rainbow Cake/Regenbogenkuchen  

Posted by: anna* in , , ,

I made another layer cake. Usually I don´t bake this much but... I felt like it. And it was my sister`s birthday.
Ich hab noch eine Torte gemacht. Üblicherweise backe ich nicht so viel aber... ich fühlte mich danach. Und meine Schwester hatte Geburtstag.
Ingrediences:
Bisquit cake:
125g Flour
175g Sugar
5 Eggs
1ts Baking powder
Food coloring (apparently the powder kind by Brauns Heitmann works great on no-cocoa dough...)
Bake 20-30 mins

Italian Buttercream:
250g Butter
4 Eggwhites
a pinch of salt
200g Sugar
150g Brittle
(Butter & Eggwhites at roomtemperature)

Since it´s pretty...longwinded to make bisquit I´ll post proper instructions to that later. But in order to make a Rainbow Cake I divided the dough up into five bowls and added a different color to each. Fun!
If you wanna do it I recommend thinking about which color goes first beforehand because you´ll need a bit more of the first color, and least of the last color.
You just fill in the dough of the color you want to be outside in the middle of your cake pan, then fill the dough of the next color in the middle of that and so on. Like that the first color-dough gets pushed to the outsides by the second, the second by the third and so on. It´s real easy.
I used the full recipe this time because I wanted to get four layers but i had to bake two cakes and cut them up like that. I was a bit worried because usually recipes say you need to bake immediately after having added all the ingrediences But baking two cakes meant I would have half the dough just sitting there while the first one was in the oven and... it turned out okay.
The Buttercream is pretty easy to make, it just takes some time. Apparently the Italian Cream is the easiest and looking at the recipes it really seems to be.
You whip up the eggwhites with a pinch of salt until they start to get firm. Slowly add the sugar and keep whipping until the eggwhite is so firm that you can hold the bowl upside down over your head (or someone elses) and nothing drips or even moves. Set aside.
But the butter in a bowl and whip it. If you have a machine, you´re lucky. It need to be whipped for 15 mins. Doesn´t sound like much? Try holding a hand mixer in one hand, a bowl full of butter that keeps splashing around the kitchen and then watch the hands of the clock. They´re moving in slow motion, trust me. But the butter ends up being white and creamy like... cream. It gets a sweet smell too. Nice.
Slowly and by hand add the butter spoon by spoon into the eggwhites and stir. Those two ingrediences, usually unlikely to go well together, really need to blend together. That done you have buttercream. Yay! You can now add fruits like strawberries or lemons, nuts, chocolate or whatever to make it even better. I decided to go for nutbrittle. Crushed, mind you. The smaller the better. Into the shredded brittle I added a spoonful of Rum, just for the fun of it. Didn´t come out in the taste at all.
Just add the crushed brittle spoon by spoon to the cream and you´re set.
This time I bought an adjustable cake ring for dressing the cake and maaaan, it´s so much easier like that! You just put the buttom layer in, make sure it´s tight and then throw in the cream. Make sure it´s everywhere, smooth it and then add the next layer of cake. And so on.
I precut the upper cake layers (not the bottom one, that holds the cake together) because cutting layercake just plain sucks. If you do that make sure you got the cuts all exactly over each other!
After the last layer I put the cake in the fridge and let it cool a bit before removing the cake ring and applying the cream as frosting. It stayed together perfectly and I just had to smear the cream all over the cake, smooth it and decorate it.
It was very yummy, looked great inside and out and my sister was happy.
Downside: It pretty much took me half the day. Make dough, color, bake, let cool a bit, then bake the next, let cool completely. Make cream, cut cake, assemble cake, decorate... But it was worth it.


The pretty rainbow dough.
Der hübsche Regenbogenteig.


Bottom layer in the cake ring.
Der unterste Boden im Tortenring.


Precut cake on top and see how even the sides are?
Der Vorgeschnittene Boden oben drauf und schaut wie schön eben die Seiten sind.


Decorated cake and presents.
Dekorierte Torte und Geschenke.


Zutaten:
Biskuitboden:
125g Mehl
175g Zucker
5 Eier
1 tl Backpulver
Lebensmittelfarbe (offenbar funktioniert die Pulverfarbe von Brauns Heitmann super mit nicht-Kakao-Teig...)
20-30 Minuten backen

Italienische Buttercreme:
250g Butter
4 Eiweiß
Eine Prise Salz
200g Zucker
150g Krokant
(Butter & Eiweiß auf Zimmertemperatur)

Weil es ziemlich... langwierig ist Biskuit zu machen, poste ich die genaue Anleitung dafür in einem seperaten Eintrag. Aber um einen Regenbogenkuchen zu machen, habe ich den Teig in fünf Teile geteilt und je eine Farbe dazu getan.
Wenn man das machen will, rate ich, zuerst darüber nachzudenken, welche Farbe man zuerst haben möchte weil man etwas mehr von der ersten Farbe braucht und am wenigsten von der letzten.
Man füllt einfach den Teig der Farbe, die man auf der Außenseite des Kuchenbodens haben möchte in die Mitte der Kuchenform, dann die nächte Farbe in die Mitte davon und so weiter. So wird der Teig der ersten Farbe von dem der zweiten Farbe in Richtung Außenseite der Kuchenform gedrückt, der der zweiten Farbe von dem der dritten Farbe und so weiter. Das ist ganz einfach.
Ich habe dieses Mal das ganze Rezept benutzt weil ich vier Schichten haben wollte, aber ich musste zwei Böden backen und die dann teilen. Ich war etwas besorgt weil in Biskuit Rezepten immer steht, man soll den Teil sofort backen wenn man ihn fertig hat. Aber zwei Böden zu backen bedeutete, dass die Hälfte des Teigs einfach so in der Küche stehen würde während der erste Boden backt und... es war in Ordnung.
Die Buttercreme ist ziemlich einfach zu machen, dauert aber eine Weile. Offenbar ist Italienische Buttercreme die einfachste aller Buttercremes und wenn ich mir so die anderen Rezepte ansehe, stimmt das wohl.
Man schlägt das Eiweiß mit einer Prise Salz solange auf, bis sie anfangen steif zu werden. Langsam den Zucker einrieseln lassen und weiter schlagen, bis das Eiweiß so steif ist, dass man es über den Kopf halten kann (der eigene oder der von jemand anderes), ohne dass es tropft oder sich auch nur bewegt. Zur Seite stellen.
Die Butter in eine Schüssel und schlagen. Wer eine Küchenmaschine hat, darf sich glücklich schätzen. Die muss für 15 Minuten geschlagen werden. Klingt nicht so lange? Einfach mal den Mixer in der einen Hand und ne Schüssel mit Butter die die ganze Küche vollspritzt in der anderen Hand halten und die Uhr beobachten. Die bewegt sich in Slow Motion, glaubt mir. Aber die Butter ist am Ende ganz cremig und weiß, wie dicke Sahne. Sie bekommt auh einen süßen Geruch. Lecker.
Langsam und von Hand die Butter Löffel für Löffel in das Eiweiß rühren. Diese beiden Zutaten, üblicherweise nicht gerade gut zu mischen, müssen wirklich zusammengemischt werden. Das geschehen hat man Buttercreme. Yay! Man kann jetzt Früchte wie Erdbeeren oder Zitrone, Nüsse oder Schokolade oder so dazugeben um sie noch besser zu machen. Ich habe mich für Krokant entschieden. Zerstoßener Krokant. Je feiner, desto besser. Ich hab dem zerstoßenen Krokant noch einen Löffel Rum zugegeben, nur zum Spaß. Ist im Geschmack nicht rausgekommen.
Den Krokant Löffel für Löfel in die Creme geben und das wars.
Dieses Mal habe ich zum Torte bauen einen Tortenring gekauft und maaaannnn, das ist soviel leichter so! Man legt den untersten Boden rein, zieht ihn fest und schmeißt dann die Creme drauf. Sicherstellen, dass sie überall ist, glatt streichen und den nächsten Boden drauflegen. Und so weiter.
Ich habe die oberen Kuchenböden vorgeschnitten (nicht den untersten, der hält alles zusammen) weil Torte schneiden einfach doof ist. Wenn man das macht, muss man nur darauf achten, dass die Schnitte auch wirklich direkt übereinander liegen!
Nach der letzten Schicht hab ich die Torte in den Kühlschrank gestellt zum abkühlen bevor ich den Ring angenommen habe um die die Creme auf der Außenseite aufzutragen. Sie ist perfekt zusammengeblieben und ich musste nur die Creme draufschmieren, glattstreichen und dekorieren.
Die Torte was sehr lecker, sah innen und außen super aus und meine Schwester war glücklich.
Nicht so schön: Es hat so ziemlich den halben Tag gekostet. Den Teig machen, färben, backen, kühlen lassen, den Nächsten backen, komplett auskühlen lassen. Creme machen, Kuchen schneiden, zusammensetzen, dekorieren... Aber das war es wert.

Delicious Fail / Red Velvet Cake  

Posted by: anna* in , , , ,

I made Red Velvet Layer Cake. Only it wasn´t red. And I didn´t find it particularly velvety, either... But it´s yummy.

Ich habe Red Velvet Torte bemacht. Nur war sie nicht rot. Und ich fand sie auch nicht besonders samtig... Aber sie ist lecker.
Ingrediences needed for the cake:
2 1/2 cups sifted flour
1/2 tablespoon salt
2 tablespoons dutch processed cocoa powder
1/2 cup butter
1 1/2 cups sugar
2 large eggs
1 tablespoon vanilla extract
1 cup buttermilk
red food coloring (2 tablespoons of the liquid stuff, apparently)
1 teaspoon white distilled vinegar (I used apple vinegar...)
1 teaspoon baking soda

For the frosting:
8 ounces cream cheese, room temperature
8 ounces of Mascarpone cheese, room temperature
1 teaspoon pure vanilla extract
1 cup confectioners' (icing or powdered) sugar, sifted
1 1/2 cups heavy whipping cream

I´m not gonna write down here what I did exactly because I got the recipe from joyofbaking.com and followed the instructions. I´d love to share my personal notes, though.
Obviously one bag of the powdered food coloring by Brauns Heitmann (a german brand) is not enough! I kinda was fooled by another blog I´ve read were the author said not to worry if the color didn´t look bright red before baking so stupid me just happily baked. The buttermilk had such a nice color and i really wanted the cake to be just as red... Well, brown is nice too and my brain probably was grateful for not trying to fool it by eating red stuff that tasted like chocolate.
In the recipe it also says to cut the cake with a serrated knife and I´ve always found this didn´t work for me. I don´t rememeber having a nice, smooth surface after cutting with a knife. So I´m using a string. Ask your local mafia killer whether he thinks a string works well for cutting things. He´ll agree, I´m sure. I usually cut a shallow ring into the side of the cake with a little knife, then put a string (anything that´s clean and thin, I use sewingthread) into the ring and just pull until the string comes out. Did that make any sense?
Pretend you´re trying to tie a ribbon of pretty sewingthread around your cake. Only don´t make a ribbon but pull the ends of the thread as if you´d try to pull the thread tighter around the whole cake to tie a knot. And woah! do we have two clean halves. Better?
With the frosting I was pretty confused about the heavy cream I have to admit. I wasn´t sure whether it had to go in whipped or not. Because last time I made a chocolate layer cake I had to whip cream with chocolate and it took ages to stiffen. So I thought this frosting was never going to thicken enough to be spread. Since the recipe never mentioned whipping it first I just gave it a try and... It works. I only had to beat the whole thing for about a minute, maybe two and then it became nice and thick. Who would`ve thought?
The batter smelled pretty vinegar-y and so did the cakes when ready but they don´t taste like that at all, don´t worry.
I also only took half of everything. It fit my little cakepan perfectly and it worked. Which is, strange enough, not a given.
In the end... I liked the cake. Regular sponge cake is velvety-er, in my humble opinion, though. I will try again hoping that it turns out prettier. Maybe a different recipe?


The pretty buttermilk.
Die hübsche Buttermilch.


Not red, but cake.
Nicht rot, aber Tortenböden.


The Cake. (insert dramatic noises here)
Die Torte. (hier dramatische Geräusche machen)


Zutaten für den Kuchen:
250 gr gesiebtes Mehl
1/2 Esslöffel Salz
2 Essöffel Koch-und Back-Kakao
113 gr Butter
300 gr Zucker
2 große Eier
1 Esslöffel Vanilleextrakt
240 ml Buttermilch
Rote Lebensmittelfarbe (2 Esslöffel von der flüssigen, die ich nicht gefunden habe)
1 Esslöffel weißer Essig (ich habe Apfelessig verwendet...)
1 Esslöffel Backpulver
Für das Frosting:
227 gr Frischkäse
227 gr Mascarpone
1 Esslöffel Vanilleextrakt
115 gr Puderzucker, gesiebt
360 ml Schlagsahne
Ich werd hier jetzt nicht schreiben was genau ich getan habe weil ich das Rezept von jopyofbaking.com benutzte und mich ziemlich genau an die Anweisungen gehalten habe. Ich würd aber gern meine persönlichen Notizen teilen.
Offensichtlich ist ein Beutelchen von dem roten Farbpulver von Brauns Heitmann nicht genug! Ich wurde irgendwie von einem anderen Blog "reingelegt" in dem die Autorin sagte, es sei OK wenn der Teig nicht so eine schöne rote Farbe hätte bevor er gebacken sei. Also hab ich dumme Nuss einfach fröhlich gebacken. Die Buttermilch hatte so eine schöne Farbe und ich wollte wirklich, dass mein Kuchen auch so schön rot wird. Aber braun ist ja auch nett und mein Hirn war vermutlich dankbar, dass ich es nicht damit verwirrt habe, etwas rotes zu essen das dann nach Schokolade schmeckt.
Im Rezept steht auch, dass man den Kuchen mit einem gezackten Messer (wie z.B. ein Brotmesser) schneiden soll und bei mir funktioniert das einfach nie. Ich kann mich nicht daran erinnern, je eine schöne glatte Oberfläche gehabt zu haben, wenn ich mit einem Messer geschnitten habe. Also verwende ich einen Faden. Fragt den lokalen Mafia Killer ob er glaubt, ein Faden sei gut, um damit Dinge zu schneiden. Ich bin sicher, er stimmt mir zu.
Ich schneide gewöhnlicherweise mit einem kleinen Messer einen nicht so tiefen Ring in die Seite vom Kuchen, lege dann den Faden (alles was sauber und fein ist, ich nehme Nähgarn) in den Ring und ziehe einfach bis der Faden rauskommt. Macht das Sinn?
Tu so, als würdest du eine hübsche Schleife aus Nähgarn um den Kuchen binden wollen. Nur mach keine Schleife, sondern zieh die Enden des Fadens so, als würdest du den Faden fester um den Kuchen binden wollen um einen Knoten zu machen. Und schwupps hat man zwei saubere Hälften. Besser?
Beim Frosting war ich etwas verwirrt bezüglich der Schlagsahne, muss ich zugeben. Ich war nicht sicher, ob sie geschlagen werden sollte oder nicht. Weil, das letzte Mal, als ich eine Schokoladentorte gemacht habe, musste ich Sahne mit Schokolade schlagen und das hat ewig gedauert. Also habe ich angenommen, dass dieses Frosting nie steif genug werden würde um es zu verstreichen. Weil im Rezept aber nichts von Sahne schlagen steht, habe ich es einfach ausprobiert und... Es funktioniert! Ich musste das Ganze nur etwa eine Minute, vielleicht zwei schlagen bevor es schön fest wurde. Wer hätte das gedacht?
Der Teig hat nach Essig gerochen und auch der fertige Kuchen noch, aber er schmeckt gar nicht danach, keine Angst.
Ich habe auch nur die Hälfte von allem genommen. Hat großartig in meine kleine Springform gepasst und es hat funktioniert was, seltsamerweise, nicht immer der Fall ist.
Am Ende... Ich mochte den Kuchen. Regulärer Biskuit-Boden ist meiner Meinung nach allerdings samtiger. Ich werd es aber noch Mal ausprobieren, in der Hoffnung, dass es dann hübscher wird. Vielleicht ein anderes Rezept?